
Looking for a remote, crowd-free way to summit Mount Kenya? The Timau Route offers a 6-day trek across the mountain’s quieter northern slopes, providing stunning views, unique wildlife, and a raw wilderness experience.
- Distance: 22 miles (36 km)
- Elevation: Starts at 8,860 ft (2,700 m) and peaks at 16,355 ft (4,985 m)
- Highlights: Sunrise at Point Lenana, rare wildlife sightings like serval cats, and breathtaking views of Batian and Nelion peaks.
- Experience: Wild camping every night, drier conditions, and fewer crowds (only 5% of climbers choose this route).
This trek is ideal for adventurers seeking solitude, unique landscapes, and a challenging climb. Each day offers distinct ecosystems, from moorlands to alpine zones, with the summit attempt on Day 4 being the most rewarding moment. Prepare for stunning views, wildlife encounters, and a journey through Mount Kenya’s untouched northern wilderness.
WINTER WONDERLAND! – Mount Kenya – Timau & Sirimon Routes
Day 1: Timau Roadhead to Marania Camp: Timau route directions
Kick off the adventure with an early transfer from Nanyuki Town to the Timau Roadhead. Located at 8,860 feet (2,700 m) above sea level [1][2]. This northern entry point marks the edge of the moorland zone. Ideally, serves as the last touchpoint with civilization before you step into the untamed northern slopes of Mount Kenya.
The first day’s trek covers 5 miles (8 km) and involves an elevation gain of 1,640 feet (500 m). It takes about 4 hours to complete firsts day Trek.[1][2][4]. The steady pace is perfect for acclimatization and allows you to ease into the journey while enjoying the ever-changing terrain. As you move along, the trail gradually introduces you to the distinct moorland environment of the mountain.
Hiking Through the Moorland Zone: Timau route directions
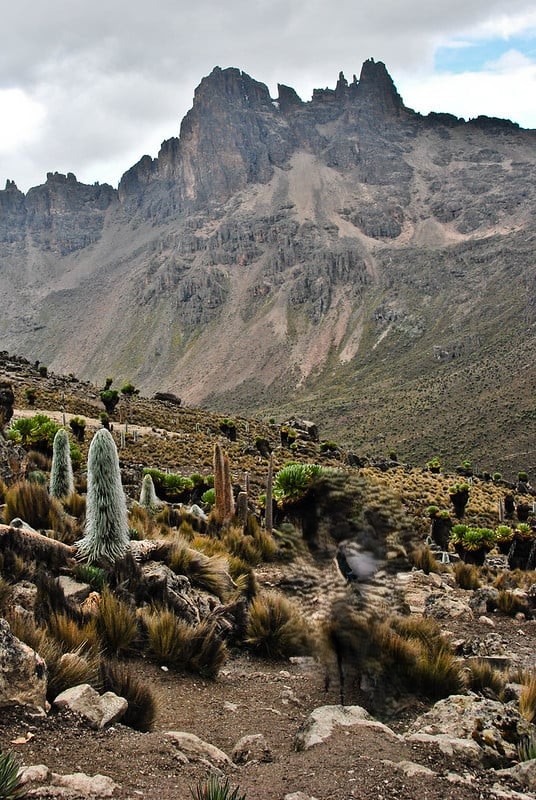
The trail immediately immerses you in Mount Kenya’s northern landscape. Strategically, an area shaped by its position in a rain shadow, which leads to sparse forest cover [5]. You’ll traverse patches of bamboo and heather before emerging into open moorlands. The views here are breathtaking, offering sweeping vistas of Kisima, Lewa Downs, Samburu, and the Northern Frontier [1]. The gentle slope and the mountain’s east-to-west alignment create the illusion of trekking across a vast mountain range rather than a single peak [5].
Wildlife sightings add an element of surprise to the day. The northern slopes are home to unique mountain species. For instance, it’s not uncommon to encounter eland, zebra, or buffalo roaming the moorlands [1]. If you’re lucky, you might even spot an elephant, though such sightings are rarer at this altitude. Around the mount there are more wildlife species to spot. Explore more places you can spot wildlife in mount Kenya.
Setting Up at Marania Camp: Timau route
Your first night on the mountain will be spent at Marania Camp, situated at 10,500 feet (3,200 m) [2][4]. This campsite offers stunning views of the surrounding moorlands. Importantly, providing a perfect backdrop to soak in the rugged beauty of the Timau Route. It’s a memorable start to your journey, combining natural splendor with the thrill of wild camping.
Day 2: Marania Camp to Major’s Camp: Timau route directions
Day 2 takes you on an 8.7-mile (14 km) journey over roughly 8 hours. Climbing 1,970 feet (600 m) into Mount Kenya’s northern wilderness [1]. As the trek progresses, the scenery becomes more dramatic, and the chances of spotting wildlife increase.
Starting early at Marania Camp is key to managing the long trek ahead. The trail winds through open, dry moorlands [1]. With a gradual ascent that helps your body adjust to the altitude while conserving energy. At these elevations, staying hydrated is essential to keep your energy levels up for the extended hike [6][7].
Wildlife Viewing on the Northern Slopes: Timau route
The northern slopes of Mount Kenya are a haven for wildlife. They offer some of the most exciting opportunities for animal sightings. As you move through the moorlands, you might spot zebra and eland grazing in the open terrain [1]. The landscape here is dotted with the striking Senecio and Lobelia plants, hallmark features of Mount Kenya’s alpine zones [3]. If you’re lucky, you might even catch a glimpse of the elusive Serval cat [1].
The views are nothing short of breathtaking. With the northern frontier stretching far into the distance and Mount Kenya’s towering peaks dominating the skyline.
Arriving at Major’s Camp: Timau route directions
The day’s trek concludes at Major’s Camp, perched at an elevation of 12,467 feet (3,800 m) [1]. This marks your entry into Mount Kenya’s higher alpine zones, where the air becomes thinner and the environment more rugged.
Major’s Camp is a critical stop for acclimatization before tackling the tougher days ahead. It offers sweeping views of Mount Kenya’s peaks and valleys. Making it an ideal spot to rest and prepare for the challenges to come. This elevation gain underscores the importance of proper rest, hydration, and nutrition. At this altitude, carbohydrate-rich meals are especially helpful, as they’re easier to digest in the low-oxygen environment [8]. Be prepared for chilly nights . Temperatures can drop significantly, and the mountain’s weather can shift quickly, so layering your clothing is a must [9].
| Day 2 Trek Details | Value |
|---|---|
| Distance | 8.7 miles (14 km) |
| Hiking Time | 8 hours |
| Elevation Gain | 1,970 feet (600 m) |
| Major’s Camp Altitude | 12,467 feet (3,800 m) |
This demanding but rewarding day sets the stage for the summit push, with Major’s Camp serving as the perfect base for the higher-altitude challenges awaiting you on Day 3.
Day 3: Major’s Camp to Simba Col: hiking timau route
After the climb to Major’s Camp, Day 3 takes things up a notch, pushing you even deeper into the high alpine zone. Covering 7.5 miles (12 km) over 8 hours, this leg of the journey includes an elevation gain of 2,790 feet (850 m), taking you from Major’s Camp at approximately 12,465 feet to Simba Col at an impressive 15,255 feet (4,650 m) [10][11].
The day begins with a gradual ascent, but as you pass the 13,780-foot (4,200 m) mark, the climb gets steeper, and the thinning air makes every step feel heavier [1]. The changing terrain signals the start of harsher, more rugged conditions as you push forward.
Climbing to Higher Elevations: Timau route difficulty
The higher you climb, the more the landscape transforms. Gone are the lush slopes of earlier days – now, you’re met with a stark, almost otherworldly terrain. The rocky, barren ground is dotted with striking plants like giant groundsels and lobelias, which have adapted to survive the mountain’s extreme temperature swings. These unique plants seem to stand guard against the dramatic backdrop of the mountain’s skyline [10][11].
The final leg of the day takes you through the Hinde Valley and across the Nithi North River. This stretch tests not just your stamina but also your focus, as the uneven terrain demands every ounce of your attention [1].
Views at Hall Tarns: hiking timau route
The effort is worth it when you reach Hall Tarns, where the Timau and Chogoria Routes come together [1]. From this vantage point, you’re treated to breathtaking views of Mount Kenya’s iconic twin summits, Batian and Nelion. The panorama also includes Temple Rock, Lake Michaelson, Hobley Valley, and Gorges Valley – a true feast for the eyes.
| Day 3 Trek Details | Value |
|---|---|
| Distance | 7.5 miles (12 km) |
| Hiking Time | 8 hours |
| Elevation Gain | 2,790 feet (850 m) |
| Simba Col Altitude | 15,255 feet (4,650 m) |
At this altitude, the air holds about 40% fewer oxygen molecules per breath compared to sea level [12]. It’s crucial to pace yourself and stay hydrated, as these conditions will test your endurance and prepare you for the challenges of the summit push ahead.
Day 4: Simba Col to Teleki Camp via Point Lenana: Timau route difficulty
Summit day is both the toughest and most rewarding part of your trek. Covering 11.2 miles (18 km), this journey begins in complete darkness as you ascend to Mount Kenya’s third-highest peak before descending to Teleki Camp. Expect about 5–6 hours of hiking, with the highlight being a spectacular sunrise at an elevation of 16,355 feet (4,985 m)[1].
Set your alarm for 2:30 AM to ensure you start early enough to reach Point Lenana by sunrise, which typically occurs around 6:26 AM[13]. The final 45 minutes of the ascent demand careful steps over rugged scree and occasional icy patches, so a reliable headlamp is essential.
This early start is your gateway to one of the most memorable moments of the trek.
Sunrise at Point Lenana: hiking timau route
The climb from Simba Col before dawn is a true test of endurance and preparation. The trail becomes harder to follow as it weaves through rocky terrain, and the thinning air adds to the challenge. But as you approach the summit cairn, the eastern horizon begins to glow, signaling the arrival of one of East Africa’s most stunning sunrises. From Point Lenana, panoramic views stretch across Kenya, with the majestic silhouettes of Batian and Nelion rising in the distance. Be sure to dress in layers and bring a flask of something warm – temperatures at this hour can be bitterly cold.
Once you’ve soaked in the breathtaking sunrise, it’s time to turn your attention to the descent.
Descent to Teleki Camp: Timau route difficulty
After taking in the summit views, the descent begins along the Naro Moru route on Mount Kenya’s southern side. The trail follows the ridge of Lenana toward the Austrian Hut and continues through Mackinder’s Camp, a perfect spot to pause for a mid-morning meal or snack[17]. As you make your way through Teleki Valley, the trail challenges your stamina, and trekking poles can be a huge help in maintaining balance[15]. At the end of the day, Teleki Camp awaits, nestled in the heart of the valley and offering a well-earned rest.
| Day 4 Summit Details | Value |
|---|---|
| Total Distance | 11.2 miles (18 km) |
| Hiking Time | 5–6 hours |
| Summit Start Time | 2:30–3:00 AM |
| Point Lenana Elevation | 16,355 feet (4,985 m) |
| Sunrise Time | 6:26 AM |
Throughout the day, make hydration a priority and keep essentials like extra food, water, first aid supplies, and warm clothing in your daypack. If visibility worsens during the descent, it’s safer to pause and wait rather than risk losing your way, as mountain weather can shift unpredictably[16].
Day 5: Teleki Camp to Mackinder Valley Camp
After the excitement of reaching Point Lenana and the rest at Teleki Camp, day five takes you on a more relaxed descent through the breathtaking landscapes of Mount Kenya[1]. This stage of the trek guides you through distinct ecological zones, leading to Mackinder Valley Camp, perched at 12,795 feet (3,900 m)[14].
The day starts with a steady descent via the Eastern Terminal, passing notable landmarks like Hut Tarn and Arthur’s Seat before arriving at Mackinder Valley Camp[1]. Nestled in the heart of Mackinder Valley, just below Shipton’s Camp, this spot is named after Halford Mackinder, who achieved the first recorded ascent of Batian in 1899[20]. The camp offers a spectacular location, sitting at the base of Mount Kenya’s three highest peaks – Batian, Nelion, and Lenana[20]. This section of the journey not only gives your body a break after the summit but also immerses you in the rich ecological variety of Mount Kenya.
Walking Through Mackinder Valley
The Mackinder Valley serves as a serene bridge between the summit’s challenges and the calmer descent to lower altitudes. The valley is a striking sight, filled with towering giant lobelias and groundsels that create a dramatic and otherworldly landscape[14]. It’s a perfect place to pause, take photos, and soak in the quiet beauty of the surroundings.
Adding to the valley’s peaceful atmosphere is the Liki North River, which winds gently through the terrain[14]. While the river is a convenient water source, make sure to treat the water before drinking it.
As you move through the valley, you’ll notice the changing ecological zones and the accompanying shifts in temperature. Mount Kenya’s climate is known for its extreme daily variations, with warm, sunny conditions during the day and winter-like cold at night[19]. Dress in layers and keep warmer clothing easily accessible to adapt to these changes.
The transition from the afro-alpine zone, marked by its unique giant lobelias and groundsels, to lower altitudes is particularly fascinating[18]. About 75% of the afro-alpine vegetation here is indigenous, offering a rare glimpse into plant life that exists nowhere else on the planet[18].
Be sure to come prepared with sturdy hiking boots, trekking poles, and a water filter to navigate rocky paths and any muddy areas you might encounter.
This part of the trek provides a much-needed break from the intensity of summit day while still showcasing Mount Kenya’s incredible scenery and unique ecosystems. By the time you reach Mackinder Valley Camp, you’ll have experienced a side of Mount Kenya that’s as peaceful as it is awe-inspiring.
Day 6: Mackinder Valley Camp to Old Moses and Departure
After a peaceful night in Mackinder Valley, the final leg of your adventure begins. Start the day with an early breakfast at Mackinder Valley Camp before packing up for the descent to Old Moses Camp. This stretch covers around 4–6 miles (7–9 km) and typically takes 2–4 hours, depending on your pace and the trail conditions[21][22]. As you make your way down, you’ll retrace portions of the trail, witnessing the gradual shift in vegetation – from the sparse alpine landscapes back to the lush moorlands.
Arriving at Old Moses Camp, located at an altitude of 10,827 feet (3,300 m), marks a significant descent. Here, the air feels noticeably lighter, a welcome change after days at higher elevations[23]. Old Moses Camp also serves as the final checkpoint within Mount Kenya National Park before your departure[24]. From this point, you’ll continue your descent to Sirimon Gate, covering approximately 5.6 miles (9 km) over 2–3 hours. This section takes you through vibrant rainforest terrain, offering a striking contrast to the alpine zones above[25].
Make sure to arrange transportation from Sirimon Gate to Nairobi ahead of time. Most organized treks include 4×4 vehicle transfers, as the access roads can be challenging for standard vehicles[22]. If you’re looking for a more budget-friendly option, some tour packages provide Public Service Vehicle (PSV) transfers[26]. To ensure a smooth departure, have your bags packed before breakfast on this final day. The drive back to Nairobi typically takes 3–4 hours, giving you time to unwind and reflect on your journey.
Looking Back on the Trek
As your trek comes to an end, take a moment to reflect on the incredible journey you’ve just completed. This 6-day adventure offers a unique glimpse into the stunning landscapes of Mount Kenya, from the remote northern routes to its diverse ecosystems.
For many, the Timau Route is an introduction to high-altitude trekking in East Africa. Along the way, you’ve gained valuable skills like altitude acclimatization, mountain camping, and navigation – skills that could prepare you for more technical climbs on Mount Kenya’s higher peaks or even other mountains in Africa.
This journey also connects you to the full spectrum of Mount Kenya’s ecosystems. From the open moorlands to the alpine zones, each step has showcased the mountain’s remarkable diversity. As your vehicle pulls away from Sirimon Gate, the peaks of Mount Kenya in the distance serve as a lasting reminder of the challenges you faced and the rewards you earned. The final descent is more than just the end of a trek – it’s a celebration of the experiences and memories that will stay with you long after you’ve left the mountain.
Planning Your Timau Route Trek
Tackling the 6-day Timau Route trek requires more than just enthusiasm – it demands careful preparation, physical readiness, and the right gear. Spanning over 30 miles with dramatic elevation changes, this trek is no walk in the park.
Start your endurance training 3 to 6 months before your trek. Aim for three sessions per week, dedicating at least two hours to activities like jogging, cycling, or swimming at 60–80% of your maximum heart rate [28]. To mimic trekking conditions, practice day hikes with a weighted backpack and sturdy hiking boots. Don’t skip stair workouts either – begin with 40 steps per leg and increase gradually while adding weight. Yoga can also be a great addition to improve your balance [28]. Once your fitness is on track, it’s time to focus on packing and logistics.
Your gear can make or break your trek. Essentials include a high-quality sleeping bag, a first-aid kit, waterproof boots, moisture-wicking layers, and dependable rain gear. Pack extra clothing – mountain weather can shift in an instant [27]. Trekking poles are a must for reducing strain on your knees during steep climbs [27]. Don’t forget navigation tools and sun protection. With your backpack ready, take care of permits and guide arrangements early.
Kenya Wildlife Service (KWS) regulations require all hikers to register at entry points and sign out upon departure. Solo hiking is not allowed, so hiring a guide is mandatory [16]. Park fees for non-residents are $60 per day, with guides charging $25–$40 daily and porters $15–$20 per day [29]. Ensure that your guide and porters carry valid KWS-issued identification cards [16].
Why Book with Wild Springs Adventures?
Once you’ve trained and gathered your gear, teaming up with experts can make your trek smoother and more enjoyable. Wild Springs Adventures Kenya specializes exclusively in Mount Kenya expeditions, including customized Timau Route treks. Founded by Nganga Kamau, the company is known for its professional guides and deep knowledge of the mountain.
Their 6-day trek packages start at $995 and include experienced porters, meals, accommodations, and cultural insights. By choosing their all-inclusive service, you can skip the hassle of coordinating permits, guides, and other logistics. Plus, by employing certified local professionals, the company supports the community while ensuring safe, well-organized adventures. Their expertise is particularly valuable for navigating the remote northern sections of the Timau Route, where weather can demand quick route adjustments.
Other Adventure Options Available
Wild Springs Adventures Kenya doesn’t just stop at the Timau Route. They offer a range of adventure packages to help you explore the best of Kenya. For those with limited time, their 5-day Mount Kenya climb packages start at $750 and feature the popular Chogoria-Sirimon route.
Wildlife enthusiasts can combine trekking with a 3-day Masai Mara safari, starting from $790. This option is perfect for visitors looking to experience both Kenya’s breathtaking mountain scenery and its famous savanna wildlife.
For a more immersive experience, the company also arranges cultural village stays and custom travel itineraries, offering a deeper connection to Kenya’s traditions while supporting local communities. For experienced climbers, they organize technical expeditions to Mount Kenya’s challenging peaks, such as Batian and Nelion, for an unforgettable mountaineering experience.
Conclusion
The Timau Route offers one of the most adventurous and overlooked ways to experience Mount Kenya. Spanning 22 miles and climbing from 8,860 to 16,355 feet, this 6-day trek takes you through some of Africa’s most breathtaking wilderness. Unlike the busier paths, this northern approach reveals landscapes and moments that are entirely its own.
What truly sets the Timau Route apart is its remote and untamed character. Positioned in a rain shadow, the area boasts drier trekking conditions and surreal, almost lunar scenery that feels like stepping into another world [1]. This distinct terrain ensures a deeper connection with nature and a sense of solitude rarely found on other routes.
Wildlife encounters add another layer of excitement. The northern slopes are home to elephants and buffalo, and due to their activity, groups are often accompanied by Kenya Wildlife Service rangers [31]. With only around 5% of Mount Kenya’s visitors venturing onto routes like Timau, this trek offers a rare, crowd-free adventure [31].
“And for anyone looking to experience Mt. Kenya without worrying about crowds, the under-visited and highly underrated Timau Route is the way to go!”– 57hours [30]
Planning is crucial for this remote journey. Since the Timau Route lacks an official park gate, trekkers must secure authorization from the Kenya Wildlife Service in advance, including pre-paid fees. Facilities are basic, with camping being the primary option, but the wilderness rewards are unmatched [32].
Highlights for Trekkers
- Daily trekking distances range from 4 to 8 miles, offering plenty of time to soak in the changing scenery and unique flora [30].
- The northern slopes provide gentler climbs and stunning views of Mount Kenya’s peaks, which align beautifully from east to west.
- Drier conditions mean less mud and more comfortable camping experiences [1].
Whether you’re drawn by the chance to see wildlife, the spectacular views from the north, or the allure of a quieter, more rugged Mount Kenya trek, the Timau Route promises an unforgettable adventure. This is Mount Kenya at its most untamed and awe-inspiring.
FAQs
The Timau Route offers a serene and less crowded path to Point Lenana, making it perfect for those who want a more tranquil trekking experience. Its remote setting ensures minimal foot traffic, allowing hikers to soak in the breathtaking scenery and peaceful ambiance of Mount Kenya.
What sets this route apart is its typically dry terrain, which is a big draw for fans of wild camping. The gradual ascent not only makes the climb manageable but also supports better acclimatization. Along the way, you’ll journey through a variety of landscapes, from dense forests to stunning alpine moorlands. If you’re after solitude, natural beauty, and a moderate hiking challenge, the Timau Route is a fantastic option.
What makes the Timau Route a unique and worthwhile choice for trekking to Point Lenana on Mount Kenya?
How can I prepare for a 6-day trek on the Timau Route to Point Lenana?
Preparing for the 6-day trek along the Timau Route calls for both physical readiness and careful planning.
Building your stamina is key. Activities like hiking, running, or cycling can help improve endurance, while strength training prepares your body for the challenges of rugged terrain. If you can, try hiking at higher altitudes beforehand – this can help your body adjust to Mount Kenya’s elevation and lower your chances of experiencing altitude sickness.
On the planning side, make sure you’ve got everything in order. Secure the necessary permits, arrange your transportation to the trailhead, and pack wisely. Essentials include sturdy hiking boots, layered clothing to handle changing temperatures, and a warm sleeping bag for chilly nights. Don’t overlook hydration and nutrition – bring enough water and energy-packed food to sustain you through the trek. Lastly, take some time to familiarize yourself with the route, key landmarks, and daily distances so you’re prepared for what lies ahead.
What wildlife and scenery can you expect on the Timau Route to Point Lenana, and how should you prepare for wildlife encounters?
Trekkers taking the Timau Route to Point Lenana are in for a visual treat, with incredible landscapes and a variety of wildlife along the way. As the trail winds through Mount Kenya National Park, you’ll have the chance to see majestic animals like elephants, buffalo, and antelope, as well as smaller creatures such as rock hyraxes and colobus monkeys. For bird lovers, the area is a haven, with species like the African Crowned Eagle and Mountain Buzzard often making an appearance. The journey also offers breathtaking views of the mountain’s peaks, the lush moorlands, and the picturesque Nithi River.
When it comes to wildlife encounters, safety should always come first. Stick to traveling in groups, stay vigilant, and resist the urge to approach any animals. Making some noise as you move can signal your presence to wildlife, which helps avoid startling them. To make the most of your trek – and to ensure both safety and respect for the environment – consider hiring a knowledgeable guide who knows the area well.