
When you’re climbing Mount Kenya’s second-highest peak, having the right Mount Kenya emergency gear can literally save your life. In this 2026 guide we explore the only emergency devices Mount Kenya climbers actually trust and carry.
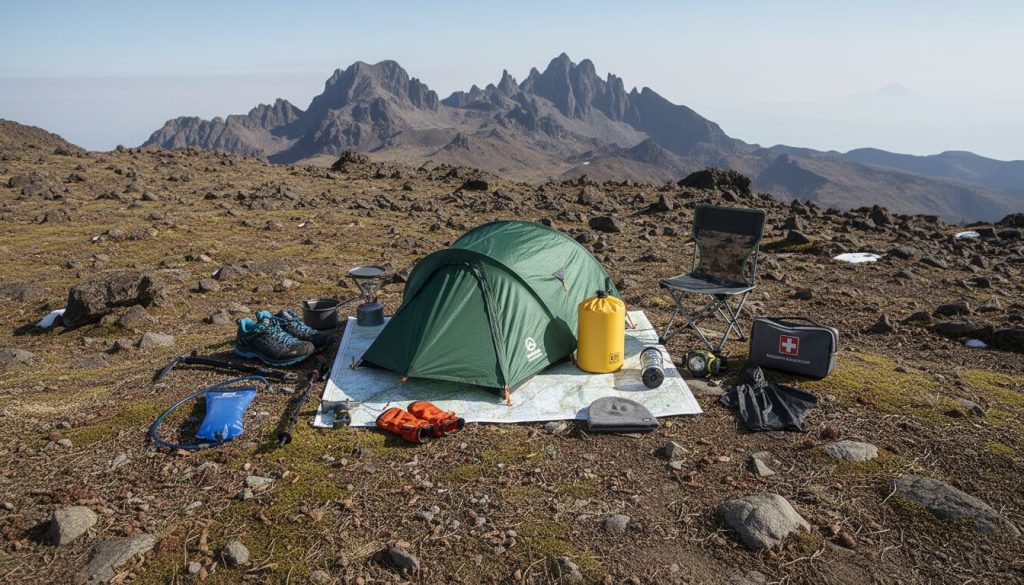
Climbing Mount Kenya is challenging, with extreme weather, high altitudes, and remote terrain. Therefore, every serious trekker must carry proven emergency devices for Mount Kenya. Our Mt Kenya Checklist – Gear and Equipment covers everything from clothing to navigation tools, but here are the top 5 devices every trekker should prioritize for emergencies
- Satellite Communication Device: Stay connected in areas without cell coverage. Devices like the ResQLink 400 can send distress signals globally without subscription fees.
- LED Headlamp: Essential for navigating in low light. Look for models with at least 80 lumens and long battery life, like the Petzl Tikka.
- Emergency Whistle: A simple tool to signal for help. Whistles can be heard up to 1.5 km (0.93 miles) in open terrain.
- High-Altitude First Aid Kit: Includes altitude sickness meds (e.g., Acetazolamide) and supplies for injuries.
- Weather Protection Shelter: Compact shelters, like bivy sacks, protect against sudden weather changes.
Quick Comparison
| Device | Key Features | Example | Cost |
|---|---|---|---|
| Satellite Device | Global coverage, no subscription, 24+ hours battery life | ResQLink 400 | $379.95 |
| LED Headlamp | 80+ lumens, long runtime, multiple light modes | Petzl Tikka | ~$30 |
| Emergency Whistle | Audible up to 1.5 km, lightweight, durable | Fox 40 Classic | ~$5-$10 |
| First Aid Kit | Altitude meds, bandages, antiseptics, emergency oxygen (optional) | Customizable | Varies |
| Weather Shelter | Lightweight, water-resistant, easy setup | Harrier Survival Bag | ~$20-$40 |
Proper preparation with these tools ensures safety and peace of mind during your trek. Read on for tips on choosing and using each device.
The Top 5 Emergency Devices for Mount Kenya Treks in 2026
1. Satellite Communication Device
In the remote wilderness of Mount Kenya, a satellite communication device can literally be a lifesaver. These tools ensure safety and preparedness during expeditions, even in areas with no cell coverage. Devices like Personal Locator Beacons (PLBs) and satellite messengers send distress signals via the global Cospas-Sarsat satellite system, which has helped save over 50,000 lives since 1982 [3].
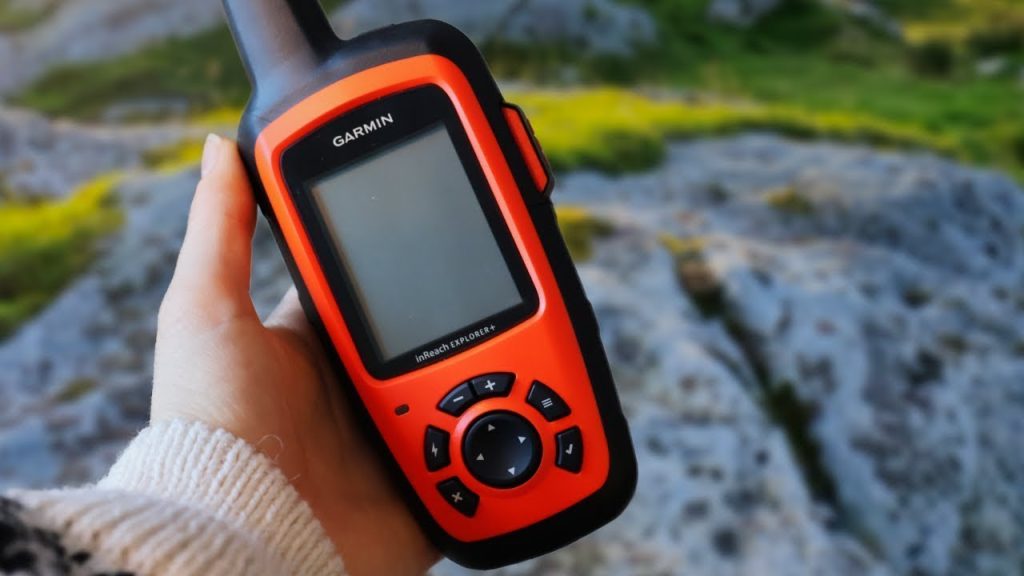
The ResQLink 400, for example, uses GPS to pinpoint your location within 330 feet (100 meters) [2]. This level of accuracy speeds up rescue efforts by making it easier to locate those in need.The ACR ResQLink View is currently the most popular emergency device on Mount Kenya among professional guides.
What to Look For in a Satellite Device
- Battery Life: Choose a model that operates for at least 24 hours at -4°F (-20°C) [3].
- Signal Range: Devices using the 406 MHz frequency provide global coverage [2].
- Durability: Waterproof and drop-tested designs ensure reliability in tough mountain conditions [3].
For those seeking a reliable option, the ResQLink 400 is a solid choice. At $379.95, it offers a 5-year battery life and over 24 hours of emergency operation. Unlike subscription-based satellite messengers, PLBs like this one come with no recurring fees because they use government-supported satellites [3].
How to Set Up Your PLB
- Register your PLB with NOAA at beaconregistration.noaa.gov [2].
- Perform a self-test every month to ensure it’s working correctly [2].
- Renew your registration every two years [2].
While mobile phones may work in some areas, their limited coverage makes them unreliable in remote regions. A satellite device ensures you can always reach emergency services when it matters most.
Next, make sure you’re prepared for nighttime navigation with a dependable LED headlamp.
2. LED Headlamp: Mount Kenya Emmergency Devices
After reliable satellite devices, an LED headlamp is a must-have for low-light conditions. It’s especially crucial for Mount Kenya treks, whether you’re tackling pre-dawn summit attempts or dealing with emergencies. The right headlamp can play a critical role in ensuring your safety. Here’s what to look for when choosing one.
Minimum and Recommended Specifications
For Mount Kenya, your headlamp should provide at least 80 lumens of brightness and a minimum runtime of 50 hours [4]. A great example is the Petzl Tikka, which offers up to 350 lumens at its highest setting and lasts up to 100 hours on its 7-lumen low mode [4].
Key features to consider:
| Feature | Minimum Requirement | Recommended |
|---|---|---|
| Brightness | 80 lumens | 200–350 lumens |
| Battery Life | 50 hours | 100+ hours |
| Beam Types | Spot beam | Spot and flood beams |
| Light Modes | 2 modes | 3+ modes with red light |
Practical Usage Tips
- Always carry spare batteries in a waterproof container to avoid running out of power unexpectedly.
- Keep your headlamp in an easily accessible spot, like the top compartment or side pocket of your pack.
- Avoid relying on your smartphone flashlight – it provides weaker light and keeps one hand occupied [4].
- Use the red light mode for tasks like reading maps or moving around camp at night. It helps maintain your night vision without disturbing others.
3. Emergency Whistle
An emergency whistle is a compact and effective signaling tool. Modern whistles can be heard up to 1.5 km (0.93 miles) in open areas [5], making them a crucial item for situations where visibility is poor or when you need to alert rescuers. Nothing beats the Garmin inReach Mini 2 as an emergency device for Mount Kenya when you need two-way texting with rescue teams.
Sound Range and Performance
The range of a whistle depends on environmental conditions:
| Environment | Maximum Audible Range |
|---|---|
| Open terrain (calm) | 1.5 km (0.93 miles) |
| Moderate wind/noise | 400 m (0.25 miles) |
| High wind conditions | 200 m (0.12 miles) |
Recognized Distress Signals
Here are standard whistle patterns for emergencies:
- Emergency Call: Six short blasts, each lasting 3 seconds, followed by a one-minute pause [6][7].
- Response Signal: Three blasts to indicate help is on the way [6].
- Location Check: One blast to ask, “Where are you?” [7].
- Come Here: Two blasts to signal someone to approach [7].
Tips for Effective Use:: Mount Kenya Emergency Devices
Keep your whistle attached to a lanyard or your pack for easy access, and blow with full force to maximize the sound’s reach [5]. A low-frequency whistle works better for carrying sound over long distances [5]. Environmental factors like wind, temperature, and humidity can affect how far the sound travels [5]. For the best results, face the direction you expect help to come from and repeat the signaling pattern until you receive a response [6].
Now, ensure your emergency kit includes a high-altitude first aid kit to be fully prepared.
4. High-Altitude First Aid Kit
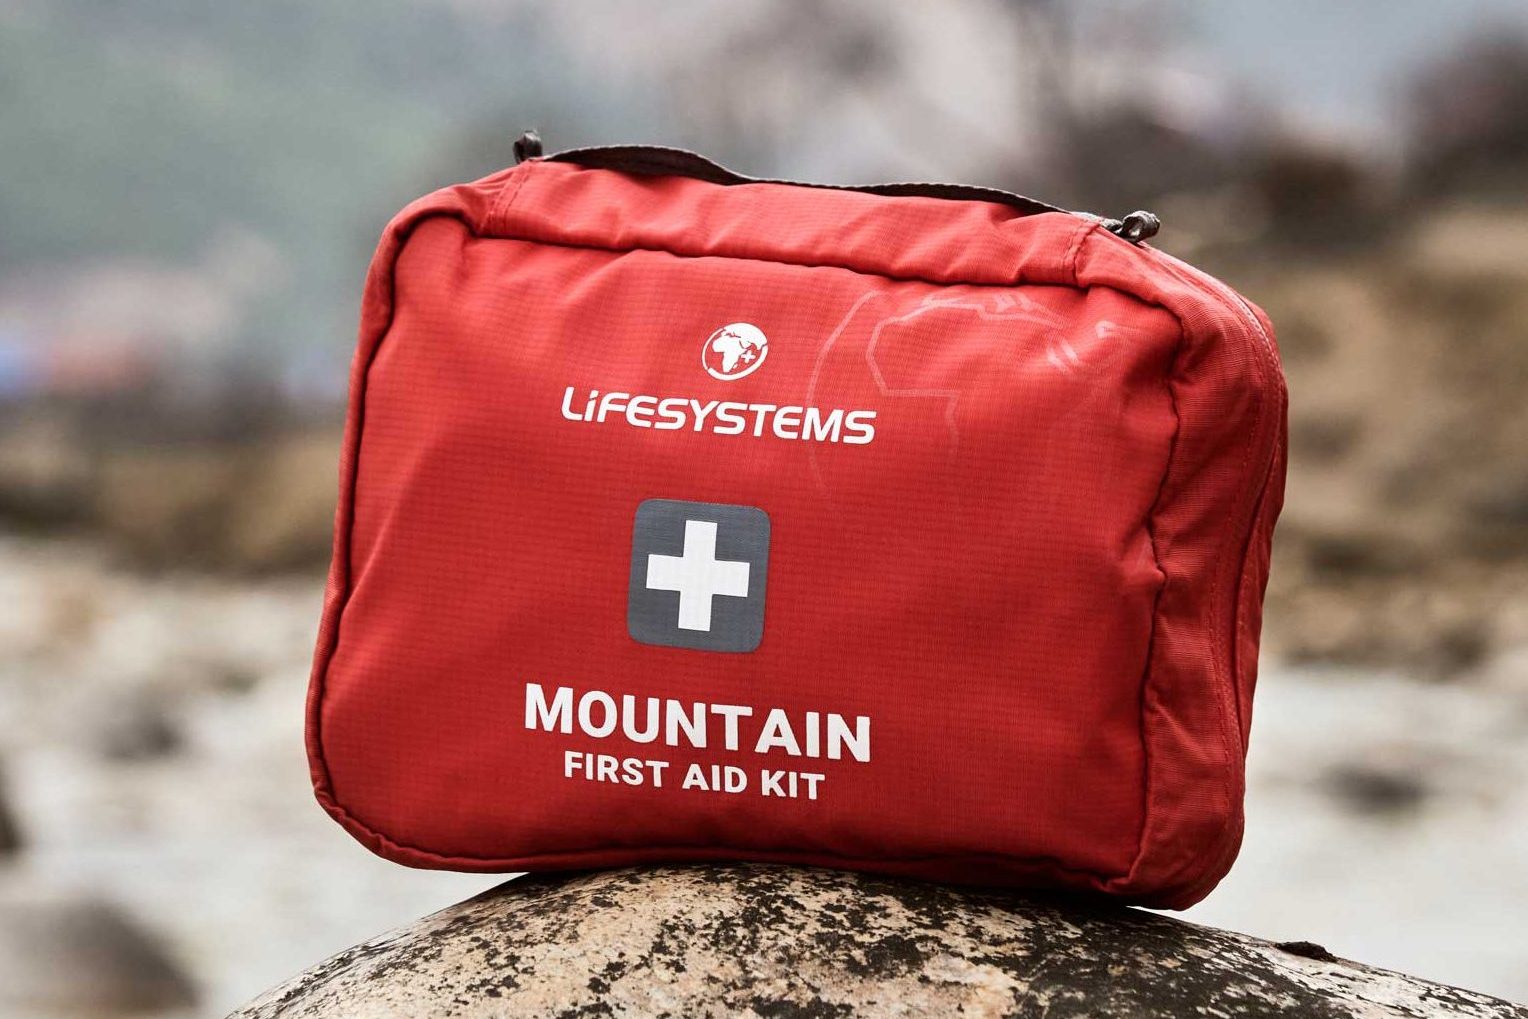
When trekking Mount Kenya, having a well-stocked first aid kit designed for high altitudes is crucial. It helps manage altitude sickness and handle common trek-related injuries. Your kit should include medications suitable for altitude sickness and essential supplies for mountain conditions. Additionally, prepare for sheltering in case of worsening weather.
Key Medications: emergency devices mount Kenya
| Medication | Purpose | Recommended Dosage |
|---|---|---|
| Acetazolamide (Diamox) | Helps prevent and treat AMS (Acute Mountain Sickness) | 125-250mg every 12 hours [8] |
| Dexamethasone | Used for emergency AMS or HACE (High-Altitude Cerebral Edema) | As prescribed by a doctor [8] |
| Ibuprofen | Relieves pain and headaches | 400-600mg every 6-8 hours [8] |
| Nifedipine | Treats HAPE (High-Altitude Pulmonary Edema) | As prescribed by a doctor [8] |
Essential Supplies to Pack
- Adhesive bandages (assorted sizes)
- Sterile gauze pads (4×4 inches)
- Medical tape
- Antibiotic ointment
- Antiseptic wipes
- Blister care items
- Swiss army knife or multi-tool
- Tweezers and safety pins
- Hand sanitizer
- Small scissors
- Latex gloves
- Emergency sugar packets
- Pulse oximeter
- Emergency oxygen (if available)
- Blood pressure monitor
- AMS assessment cards
Regularly checking and organizing your kit ensures you’re always prepared for emergencies on the mountain.
Storage Tips
Use a waterproof, sturdy container to store your supplies. Organize items in resealable bags for easy access, and place the kit in an easily reachable spot in your backpack.
“We have received a medical kit for each National Police Reservist, and they are really helping us in the field when we have an injury. These medical kits are easily portable and so each ranger can carry it all the time. We are very grateful to ForRangers for receiving these items.” – Ranger Ndesi Morijo, 2nd in charge [9]
Things to Keep in Mind
- Talk to your doctor about altitude sickness medications [1]. Before packing, ensure you’ve completed essential health checks, such as blood pressure and oxygen levels.
- Check expiration dates and read usage instructions for all items before your trip.
- Customize your kit to fit your medical needs or history.
- Store medications in their original packaging.
- Your first aid kit should work alongside other emergency tools for a complete safety plan.
Altitude sickness can become severe quickly. If someone shows serious symptoms, descending immediately is critical [10]. While your first aid kit is essential, it should never replace professional medical care when needed.
5. Weather Protection Shelter
Mount Kenya’s weather can shift quickly, with temperatures ranging from 64°F at lower elevations to as low as 27°F higher up. Precipitation varies too, from heavy rain to snow [11][12]. These extreme conditions make it essential to choose the right emergency shelter.
What to Look For in a Shelter
An effective shelter should use water-resistant materials and have properly sealed seams. For example, the Borah Gear Ultralight Bivy features a silpoly bottom and Argon67 top, offering breathable, reliable protection [14].
Tips for Setting Up
To stay protected during sudden weather changes:
- Pick elevated ground near natural windbreaks like trees.
- Ensure good ventilation to reduce condensation inside the shelter.
- Carry a small travel towel to manage moisture.
- Store your shelter in an easily accessible pack compartment.
The Harrier Trail Running Emergency Survival Bag, weighing just 4.5 oz (129g), is a compact and lightweight option for emergencies [13]. Pairing a water-resistant bivvy with a lightweight tarp adds extra versatility without adding bulk [14]. Together, these tools help you stay prepared for Mount Kenya’s unpredictable conditions.
Safety Device Specs
Let’s dive into the technical details of the satellite communication device designed to keep you prepared for emergencies.
Satellite Communication Device
The ResQLink 400 Personal Locator Beacon (PLB) is compact and dependable, making it a solid choice for emergency scenarios:
- Weight: 5.1 oz (144 g)
- Dimensions: 4.52″ × 2.03″ × 1.49″
- Operating Frequency: 406 MHz (for global distress signals) and 121.5 MHz (for homing)
- GPS Accuracy: Pinpoints location within 100 meters
- Design: Buoyant and water-resistant
Compatibility & Registration
Here’s a breakdown of its compliance and registration features:
| Feature | U.S. Compliance | Requirements |
|---|---|---|
| Frequency Standards | FCC-approved 406 MHz | Works globally |
| Registration | Required by NOAA | Renewal needed every 2 years |
| GPS Systems | Supports GPS, Galileo, and GLONASS | Ensures broad satellite coverage |
| Emergency Response | Linked to USAFRCC | Alert hotline: 1-800-851-3051 |
These features ensure the device performs reliably when you need it most.
Usage Guidelines
Follow these tips to keep your device ready for use:
- Check airline policies if you plan to travel with your beacon.
- Store it in an accessible spot and carry extra batteries.
- Attach it securely to a backpack strap or keep it in an easy-to-reach pocket.
With its built-in strobe light and infrared capabilities, the ResQLink 400 improves visibility during nighttime rescues, making it a must-have for your emergency gear.
Next Steps
Before heading out on your trek, take these important safety measures to ensure you’re fully prepared:
- Register Your Device Make sure your PLB (Personal Locator Beacon) is registered as outlined earlier, and keep your documentation up to date [3].
- Check Your Gear Perform these critical equipment checks:
- Test your PLB monthly using its self-test function.
- Use fresh batteries and pack extras.
- Inspect your first aid kit for expired items.
- Ensure your emergency shelter is in good condition.
Once your equipment is ready, consider booking a guided trek to enhance your safety.
- Choose a Safety-Focused Trek Our guided Mount Kenya treks prioritize safety with these features: Safety Measure Details Guide Certification Certified guides trained in wilderness first aid. Emergency Equipment Satellite communication devices and comprehensive first-aid kits provided. Safety Briefing Pre-trek orientation on emergency protocols and gear usage. Rescue Coordination Direct access to KWS ranger stations for fast emergency response.
“Hiking Mount Kenya alone is prohibited for safety reasons. Hiring a certified guide ensures you have someone with extensive knowledge of the mountain and wilderness expertise.” [1]
These steps align with the emergency devices discussed earlier, offering an added layer of security during your trek. Our 5-day Chogoria-Sirimon trek starts at $750. Contact us to reserve your spot for a safe and memorable Mount Kenya adventure.
Proper preparation goes beyond gear. Review our list of The Top 10 Hiking Essentials to ensure you’re fully equipped for the trail. Pair this with Group Coordination Tips for Mount Kenya to avoid common teamwork pitfalls in remote terrain. – Cospas-Sarsat has already saved over 50,000 lives [3].
FAQs: Emergency devices mount Kenya
Why is a satellite communication device better than a mobile phone for Mount Kenya treks?
Satellite communication devices are more reliable than mobile phones during Mount Kenya treks because they use satellites to transmit signals instead of relying on cell towers. This ensures connectivity even in remote areas where mobile networks are unavailable.
With features like SOS buttons and two-way messaging, these devices provide a dependable way to call for help or share updates in emergencies, making them an essential safety tool for high-altitude and off-grid adventures.
What should a high-altitude first-aid kit for Mount Kenya include?
A high-altitude first-aid kit for Mount Kenya should be tailored to the unique challenges of trekking at elevation. Key items include blister treatment supplies (like moleskin or blister pads), pain relievers that are safe for altitude, antiseptic wipes, and any personal medications you may need.
Additionally, it’s essential to include items for altitude-related symptoms, such as medication for nausea or headaches. Make sure you know how to use every item in the kit – preparation is just as important as the supplies themselves. For peace of mind, consult with your trekking guide for recommendations and advice on high-altitude first-aid essentials.
How do I use an emergency whistle effectively during a Mount Kenya trek?
To use an emergency whistle effectively on Mount Kenya, ensure it is always within easy reach, such as attached to your backpack or around your neck. In case of an emergency, blow three short blasts – the universal distress signal – and pause to listen for a response. Repeat this pattern until help arrives. A whistle’s sound carries much farther than your voice, especially in windy or noisy conditions, making it an essential tool for signaling in difficult environments.
What are the must-carry emergency devices for Mount Kenya in 2026?
Personal first aid kit (Diamox, painkillers, blister plasters, antibiotics). Map, compass, headlamp, and whistle. High-energy snacks and extra water. Power bank for your phone. Pulse oximeter for altitude monitoring. Emergency oxygen canister (if your guide provides it). Reliable multi-tool or knife. Always climb with an experienced guide – they carry the main rescue gear.
Do I need a porter for Mount Kenya?
While not mandatory, porters are invaluable for carrying gear, setting up camp, and ensuring safety. Learn how they contribute to successful expeditions in our guide: How Porters Support Mount Kenya Treks.
Pack these five emergency devices for Mount Kenya and you turn a potential disaster into a manageable situation.